
Reduce Image Size Without Losing Quality – Free Tool
Every image file carries more data than most people ever actually need. Raw photos from a DSLR or modern smartphone routinely land between 3MB and 10MB. The web doesn't need that — and neither does your email, your presentation, or your social media post.
This guide explains exactly how to reduce image size without losing quality — what that phrase actually means technically, where the size savings come from, and how to use the WebEasyTools Reduce Image Size tool to compress and resize images in your browser with zero quality loss.
What Does "Reduce Image Size Without Losing Quality" Actually Mean?
This phrase gets thrown around a lot — and it confuses people because it sounds like magic. Here's what it actually means in practice.
Every image file contains two types of data: the pixel information that creates the visual, and overhead data that is largely invisible to the human eye — metadata, redundant color information, embedded color profiles, EXIF camera data, and unnecessary padding introduced by the camera or editing software.
Reducing image size without quality loss means stripping that overhead data and recompressing the file more efficiently — without touching the actual pixel information your eyes perceive. The resulting image looks identical to the original. The file is just significantly smaller.
There's also a second approach: dimensional resizing. If a product photo is 4000×3000 pixels but it will be displayed at 800×600 on your website, the extra pixels are genuinely wasted data. Scaling the image down to its actual display dimensions removes that waste permanently — again with no visible quality difference in context.
The key principle: "Losing quality" only happens when you compress past the threshold your eye can detect, or when you scale an image up beyond its original resolution. Compressing down to display size — done correctly — is invisible.
Why Image File Size Matters
The impact of unoptimized images isn't theoretical. It shows up in measurable, specific ways:
Key Benefits of Using a Browser-Based Image Size Reducer
-
🔒
100% browser-based — your files never leave your device. The WebEasyTools image reducer processes everything locally. No file is uploaded to any server. This matters for confidential product photos, personal images, and anything covered by data policies.
-
⚡
Instant processing with no queue. Because compression happens in your browser rather than on a remote server, there's no upload wait, no processing delay, and no queue to join. Results appear in seconds.
-
📐
Dual compression modes — percentage scaling and custom dimensions. Scale an image to a percentage of its original size, or set exact pixel dimensions. Both approaches eliminate unnecessary pixels while preserving sharpness.
-
🖼️
Batch processing for multiple images. Upload several images at once and resize them all in a single operation. For product catalogs, event galleries, or blog image sets, this saves significant time.
-
🎯
Precise control over output size in KB. Specify a target file size — not just dimensions — so you know exactly what you're getting before you download. Critical for platform upload limits and bandwidth-sensitive deployments.
-
💸
Completely free with no account required. No subscription, no watermark on output, no daily limit. Open the tool, compress your images, download the results, done.
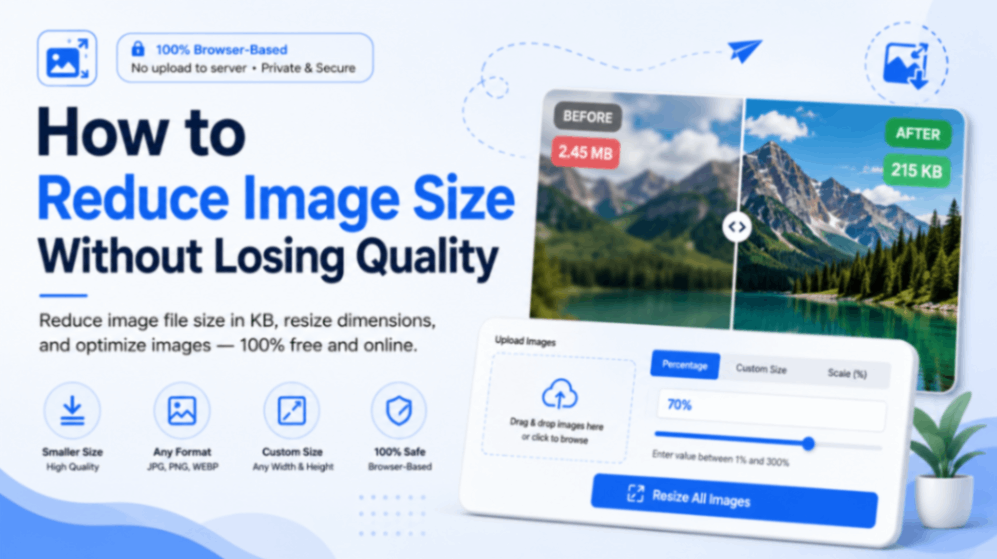
How to Use the Reduce Image Size Tool
The WebEasyTools Reduce Image Size tool gives you two distinct modes depending on your goal. Here's exactly how each one works:
Scale your image to a percentage of its original dimensions. Enter any value between 1% and 300%.
- Set 50% to halve width and height simultaneously
- Aspect ratio is preserved automatically
- Best for quick size reduction when you don't need exact pixel dimensions
Set exact pixel dimensions — any width and height — with no quality loss on the output.
- Specify width, height, or both
- Ideal for platform-specific requirements (e.g. 800×600 for a CMS)
- Best when you need to hit a specific display size exactly
Both modes support batch processing — upload multiple images and apply the same settings to all of them in one operation. The tool runs entirely in your browser, so there's no upload delay regardless of file count.
Step-by-Step Guide to Reducing Image Size
Visit the Reduce Image Size tool. No login, no install, no extension. Works on Chrome, Safari, Firefox, and Edge — on desktop and mobile equally.
Click the upload area or drag and drop your image files directly. You can upload multiple images at once. Supported formats include JPG, PNG, and WebP.
Select Percentage to scale by a proportion of the original (e.g. 50% to halve all dimensions), or Custom Size to enter exact pixel width and height. Both modes preserve aspect ratio by default.
Type in your scale percentage (1–300%) or your target dimensions in pixels. For most web use cases, scaling to 50–70% of the original delivers significant file size reduction with no visible difference on screen.
The tool processes all uploaded images simultaneously in your browser. For a batch of 10 images, this typically takes 2–5 seconds depending on original file sizes.
Download individual images or grab the entire batch. The output shows the new file size so you can confirm the reduction before saving. Your originals are untouched — the tool only outputs new files.
Real-World Examples of Image Size Reduction
Here's what image compression looks like across common use cases:
Common Mistakes When Reducing Image Size
Running a JPG through compression once produces a smaller file with minimal quality loss. Running the already-compressed output through compression again compounds artifacts. Always compress from the original — never from a previously compressed version.
The tool supports scale values above 100% — but scaling an image up adds pixels by interpolation, which softens the image. Use values above 100% only when you understand the trade-off. For size reduction, stay at or below 100%.
Compressing a full-page background hero image to 200px width and then stretching it back to full screen in CSS will look terrible. Always compress to the actual display dimensions, not smaller.
PNG is lossless and great for graphics with flat colors, transparency, or text overlays. For photographs, JPG compresses far more efficiently with no visible loss. If your photo workflow produces PNGs, converting to JPG before compressing can halve file sizes again.
Always keep your full-resolution originals in a separate folder. The WebEasyTools reducer outputs new compressed files and leaves your originals untouched — but the habit of keeping source files protects you if you ever need a higher-resolution version later.
Best Practices for Image Size Optimization
Check your CMS, theme, or platform's recommended image dimensions before you start. Compressing to the right size from the beginning avoids a second round of processing.
Store your full-resolution source files in a dedicated folder you never touch. Only work with compressed copies for publishing. This way, if display requirements change, you can always re-compress from the original.
Make image compression the last step before upload — not an afterthought. Batch-compress before uploading to WordPress, Shopify, or your CMS, rather than uploading first and dealing with oversized files later.
Use JPG for photographs and images with gradients. Use PNG for logos, screenshots, and images with transparent backgrounds. Using the wrong format for the content type wastes file size unnecessarily.
If your site serves both desktop and mobile, ideal image dimensions differ. A 1400px hero looks great on desktop but wastes bandwidth on mobile. Many CMS platforms serve different image sizes by breakpoint automatically if you upload the right source size.
If you regularly work with images, having the Reduce Image Size tool bookmarked means zero friction when the need arises — no searching, no ads to navigate past, no account wall.
Why Choose the WebEasyTools Reduce Image Size Tool
Most image compression tools online ask you to upload your files to a remote server. That means your images — including confidential product photos, internal design mockups, personal pictures, or anything covered by client data agreements — leave your device and sit on someone else's infrastructure.
The WebEasyTools Reduce Image Size tool works entirely in your browser. Processing happens locally using your device's compute. Nothing is transmitted, nothing is stored, nothing is logged. The privacy difference is real and significant.
Beyond privacy, the tool is genuinely fast for the same reason. Without a round-trip to a server, you skip upload time entirely — which, for batches of large files on slower connections, makes a meaningful practical difference.
The dual-mode interface — Percentage and Custom Size — covers the two main use cases without overcomplicating things. You don't need to understand compression algorithms or image formats to get the right result. Enter your target, click resize, download.
Frequently Asked Questions
Can I really reduce image size without losing quality?
Yes — within limits. Dimensional resizing down to your actual display size removes pixels you were never showing anyway. There's zero visible quality loss from that. Compression of pixel data becomes visually noticeable only below roughly 60–70% quality on most JPEG encoders, and most tools default well above that threshold.
How do I reduce image size in KB to meet a specific limit?
Use the Percentage mode and start with a scale that roughly matches your target. For most JPEG photos, scaling to 30–40% of original dimensions reduces file size by 85–95%. Check the output file size shown by the tool before downloading. If it's still above your limit, reduce the percentage further.
Is it safe to use a browser-based image tool?
Safer than server-based tools, in fact. When a tool is browser-based, your files are never transmitted anywhere. The WebEasyTools image reducer processes images entirely on your device using your browser's built-in APIs. No file touches a server at any point in the process.
What's the difference between image resizing and image compression?
Resizing changes the pixel dimensions of an image — fewer pixels means a smaller file. Compression reduces file size by encoding the existing pixel data more efficiently without removing pixels. Both approaches reduce file size. Resizing to display dimensions is generally the most effective approach for web and email use cases.
Can I resize multiple images at once?
Yes. The Reduce Image Size tool supports batch processing. Upload multiple images, set your target percentage or dimensions, and click Resize All Images. All files are processed simultaneously and available for individual or bulk download.
Does reducing image size affect SEO?
Positively. Google uses Core Web Vitals as a ranking factor, and Largest Contentful Paint — which measures how fast the main page content loads — is directly affected by image file sizes. Properly optimized images improve LCP scores, reduce page weight, and contribute to better search rankings over time.
Final Thoughts
The gap between a 5MB raw photo and a 200KB web-ready version is almost entirely invisible to the human eye — but it's enormously visible to page load times, email servers, upload forms, and storage invoices.
Learning how to reduce image size without losing quality isn't a complex skill. It's a two-step habit: know what display size you need, and compress to that size before publishing. Once it's part of your workflow, it takes seconds and pays off every time someone loads your page on a slow connection or your email delivers without bouncing back.
The WebEasyTools Reduce Image Size tool makes this as frictionless as it can be. Browser-based processing, no account required, percentage and custom dimension modes, batch support, and zero cost. It handles the compression correctly so you can focus on everything else.
Bookmark it. Add it to your pre-publish checklist. Your users — and your Lighthouse scores — will notice.